Although this is a quite minimalistic howto you should be able to do IP masquerading between your WLAN cards in less than 2 minutes. As I posted here I’d like to share use my WLAN cards to share one cards Internet connection with the other one. The following steps don’t apply only to wifi cards. The same commands should work on Ethernet cards too. Let’s start…
The Big picture
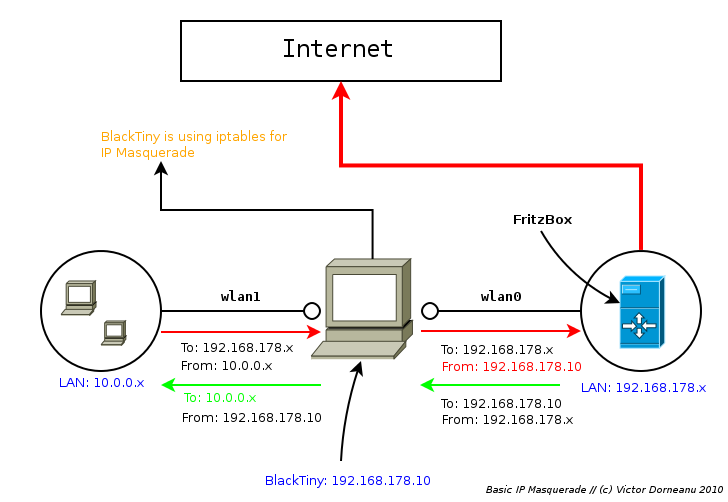
As you see you have 2 networks:
- 10.0.0.x (on wlan1)
- 192.168.178.x (wlan0)
wlan1 will act as a Access Point waiting for incomming connections and wlan0 will be connected to the Internet via FritzBox. Let’s get all the pieces together.
Configure wlan0
Well there is not much to say about this section. Make sure you have a working Internet connection via wlan0.
Configure wlan1
Now comes the more interesting part. You want to allow your clients (whoever they are) to connect to your host via wlan1 and use the Internet connection on wlan0. Pretty much … simple! Let’s sum up which steps are required:
- Allow users to connect to wlan1
- Make sure clients get an IP address which is different wlan0′s one (just for simplicity sake)
- Allow your host to do IP Forwarding
- Forward packets comming from wlan1 to wlan0
- Forward packets which refer to our 10.0.0.x network from wlan0 to wlan1
Configure hostapd
That sounds quite simple, isn’t it? Suppose wlan1 is already listening for incoming connection. You can achieve that by using hostapd and thereby acting like an Access Point on wlan1. Maybe I’ll write an additional tutorial related to this topic. But by now let’s say hostapd is running (among with **dhcpd, **which will assign IP addresses to the clients) and your clients are able to connect to your wifi interface and are successfully in getting an IP address.
|
|
wlan1 is now acting as an AP. That’s fine for now. Now we must take care every clients will get a valid IP address. Let’s have a look at /etc/dhcpd/dhcpd.conf:
|
|
By this configuration we will assign IP addresses between 10.0.0.10 - 10.0.0.100 with netmask 10.0.0.255. You might wonder about the last 2 lines. Well these ones have to be set individually. Have a look at /etc/resolv.conf and you’ll know which domain-name-servers options you’ll be using
|
|
Before you move on to next step we’ll have to assign wlan1 an IP within our network range, otherwise the clients won’t be able to communicate with our interface.
|
|
Now start the dhcp server:
|
|
Do some tests
Let’s say host BlackTiny is listening for incomming connections and host *Daemon* would like to connect to BlackTiny. Start with the client:
|
|
As you see our client Daemon got an IP: 10.0.0.10. Let’s have a look at the server/host side:
|
|
So everything seems to work. How about Internet connectivity?! **Client *Daemon***:
|
|
Oh … I have forgotten about that. We’ll have to allow Daemon to access the Internet through BlackTiny. Move on to the next step.
Do the cool stuff
First of all we’ll enable port forwarding on BlackTiny:
|
|
Now we’ll do some magic iptables stuff:
|
|
Now we will enable MASQUERADING on wlan0:
|
|
That means every time a packet from Daemon is sent to other network like its own one, this certain packet will first get in its header the IP address of wlan0 and be forwarded to the next station till it reaches its destination (see Big Picture). Any outgoing/forwarded packet will be masqueraded. So all packets will appear to come from the masquerading host (BlackTiny). There is nothing more to say about it. That’s the all stuff behind it.
Alternatively you could use the SNAT target within iptables:
|
|
Here is an explanation( found on Linuxtopia.com):
“The -to-source option is used to specify which source the packet should use. This option, at its simplest, takes one IP address which we want to use for the source IP address in the IP header. […] The -to-source IP numbers could then, for instance, be something like: 194.236.50.155-194.236.50.160. […] We can also specify a range of ports to be used by SNAT. All the source ports would then be confined to the ports specified. The port bit of the rule would then look like in the example above, :1024-32000. This is only valid if -p tcp or -p udp was specified somewhere in the match of the rule in question. […]”
Give it a try
Client Daemon:
|
|
Have fun and keep it clean!