Proxying HTTP(s) traffic from Android devices through Burp should be actually no magic. Nevertheless you’ll have to take some important steps into consideration:
-
Install Burps CA cert on the device
- I usually access Burp directly and download the cert file (
cacert.crt) - If Burp is listening on
192.168.1.1:8080, just go tohttp://192.168.1.1:8080/certto download the cert - Push this file to your device and install the certificate
- I usually access Burp directly and download the cert file (
-
Install ProxyDroid on Android
- Set proxy setting globally or only for certain applications
In theory that’s all! BUT: During recent mobile application pentest sessions, I’ve noticed that sometimes applications traffic is not being passed through the proxy, especially when the application does not connect to standard HTTP ports like 80 or 443. Besides that: What about SSDP and all other text-based protocols you would like to intercept in Burp? In most cases the proxy settings will simply be ignored and the traffic would be routed directly to the destination. In order to achieve my goal I’ll be using iptables and some Burp settings most pentest aren’t aware of. But first things first: The basics.
Virtual pentest environment
Before getting into details let’s “virtually” (rather mentally) create a network we can use as an example:
blockdiag code
nwdiag {
 internet [shape = cloud];
 internet -- router;

 network internal {
      address = "192.x.x.x/24";

      router [address = "192.x.x.1", shape=cisco.router];
      burp [address = "192.x.x.2", shape=cisco.pc];
      android-client [address = "192.x.x.3", shape=cisco.pda];
      others [address = "192.x.x.4-100", shape=cisco.web_cluster];
  }
}

So nothing special about it. The burp instance is running on my local machine and it’s listening on 192.x.x.1:8080 for incoming connections.
Some words about proxying
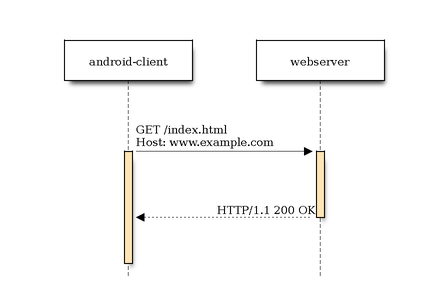
Using no proxy at all, your client (in our case the target application) will have no pre-routed connections to its destinations. It will access them directly:
blockdiag code
seqdiag {
  	android-client  -> webserver [label = "GET /index.html\nHost: www.example.com"];
  	android-client <-- webserver [label = "HTTP/1.1 200 OK"];
}
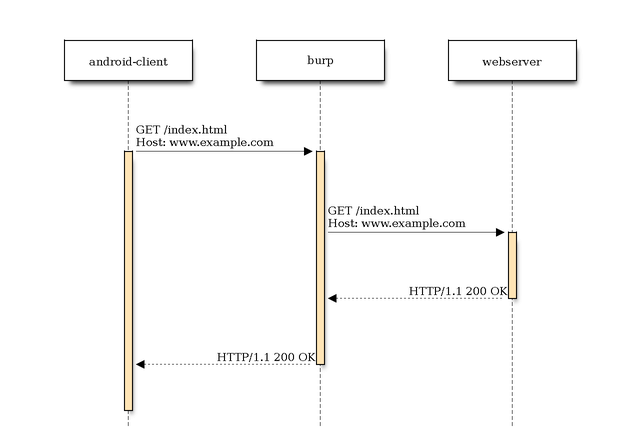
Using burp as a proxy it will act as an intermediate between the webserver and the client:
blockdiag code
seqdiag {
	android-client  -> burp [label = "GET /index.html\nHost: www.example.com"];
  	 				   burp  -> webserver [label = "GET /index.html\nHost: www.example.com"];
  	 				   burp <-- webserver [label = "HTTP/1.1 200 OK"];
  	android-client <-- burp [label = "HTTP/1.1 200 OK"];
}
Ok, so that’s no big deal and works as expected as long as your application/client knows how to connect to the proxy and it’s aware of that fact. But what about the clients that are not aware of the fact that their connection will be proxied? Let’s have a closer look at this particular case.
Non-proxy-aware clients
Proxy-aware clients need to be told how to connect to the proxy and the proxy server however knows how to connect to the final destination. Non-proxy-aware applications don’t know that the connection is proxied through some other host. In that case some other additional steps are required to proxy the connection through Burp.
In most cases you’ll have to redirect the packages at a lower OSI level (rather than the application layer). In concrete terms that means you’ll have to redirect the IP packets on the android-client to the burp instance. Burp instead must know where to redirect the packets (answer from webserver) back. This is the point where you’ll need your operating system handle some things for you.
Some words on redirects
On most Linux based hosts you’ll have iptables installed which will help us out with packet filtering / redirects. By rooting your Android device you should be able to take advantage of using iptables. Otherwise I’d recommend you Debian Kit. The general iptables packet traversal scheme looks like this:
blockdiag code
blockdiag {
	packet [shape=beginpoint];
	system;
	prerouting;
	is_forward [shape=flowchart.condition, label="Forward?", width="150", height="80", fontsize=18];
    forward;
	input;
	output;
	final_output [shape=dots, label="destination"];
	postrouting;

	packet -> prerouting -> is_forward [folded];
	is_forward -> input [label="no", textcolor="red"];
    input -> system -> output;

    is_forward -> forward [label="yes", textcolor="green"];
    forward -> postrouting;
	output -> postrouting;
	postrouting -> final_output;
}
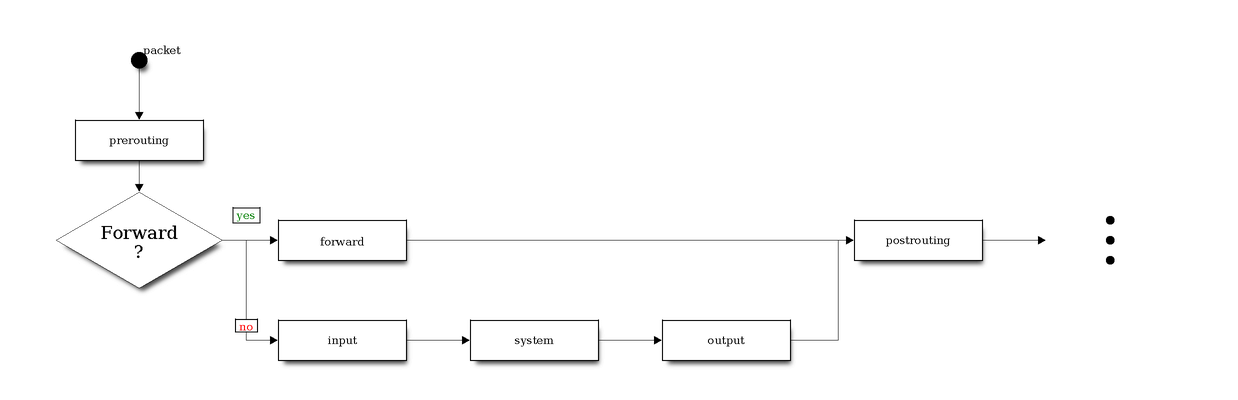
In reality the truth is more complicated. And besides that there are several tables which I haven’t taken into consideration. And speaking of tables: The filter and nat ones are those you’ll mostly deal with. But like already mentioned: For the sake of simplicity … :)
Since we are generating packets locally (on android-client) the output firewall chain is our main point of interest.
blockdiag code
blockdiag {
	packet [shape=beginpoint];
	system;
	prerouting;
	is_forward [shape=flowchart.condition, label="Forward?", width="150", height="80", fontsize=18];
    forward;
	input;
	output [color="#CCFF33", fontsize=18];
	final_output [shape=dots, label="destination"];
	postrouting;

	packet -> prerouting -> is_forward [folded];
	is_forward -> input [label="no", textcolor="red"];
    input -> system -> output;

    is_forward -> forward [label="yes", textcolor="green"];
    forward -> postrouting;
	output -> postrouting;
	postrouting -> final_output;
}
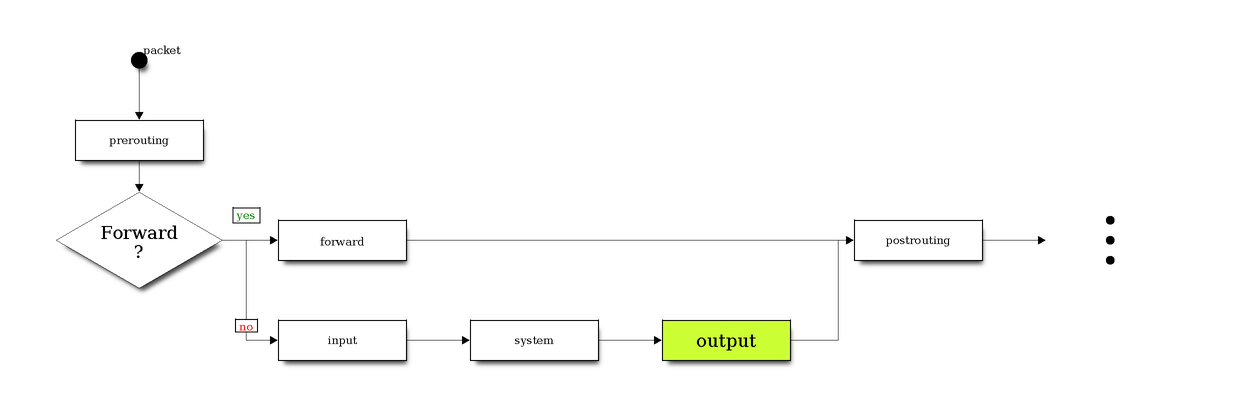
While forwarding and re-routing packets between the android-client and the webserver through burp you won’t be able to avoid NAT (Network Address Translation). While modifying certain headers in the IP datagrams, packets are “re-mapped” from one IP address to another one. iptables can handle NAT (-t nat) and has 3 predefined chains: PREROUTING, OUTPUT and POSTROUTING.
Proxying with ProxyDroid
Before getting into the cool stuff, let’s see what happens when ProxyDroid is used. You can use it only on a rooted device since internally it depends on iptables.
HTTP
I’ve used these settings:
- Host: 192.168.1.2
- Port: 8080
- Proxy-Type: HTTP
On 192.168.1.2 burp is listening in port 8080 for incoming connections. Now let’s have a look at the iptables rules:
|
|
We can see that:
- Every TCP-Connection with destination port
www(80) will be redirected tolocalhost:8123 - Every TCP-Connection with destination port
https(443) will be redirected tolocalhost:8124
Apparently ProxyDroid itself listens on ports 8123, 8124 for incoming connections before redirecting them to burp. Just for the sake of completeness, let’s have a look at the other proxy types.
SOCKS4
Using SOCKS4 as proxy type you’ll get:
|
|
Regardless of the port all connection will be redirected first to localhost:8123 (ProxyDroid) and then to the specified <host>:<port> pair.
SOCKS5
The iptables rules for SOCKS5 and SOCKS4 are pretty similar:
|
|
In other words the connection flow looks like this:
blockdiag code
seqdiag {
	android-client  -> ProxyDroid;
  	 				   ProxyDroid  -> burp;
  	 				                  burp  -> webserver;
                                      burp <-- webserver;
                       ProxyDroid <-- burp;
  	android-client <-- ProxyDroid;
}
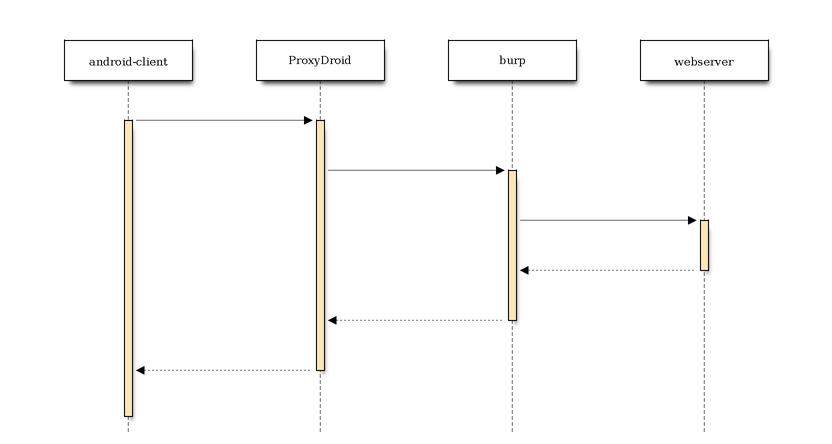
Testing the connection
Using a HTTP proxy we’ll test the connection between android-client and some webserver out there. Since the connection is proxied through burp we should be able to see it. On android-client I run:
|
|
On burp I can see the request:
|
|
So everything is ok, for now. But that’s not the purpose of this post. Let’s have a look at another text-based protocol we’d like to sniff using burp.
SSDP
Using SSDP I’d like to find any UPnp devices available on the LAN. All you need to do is to send an UDP message to the multicast address 239.255.255.250 on port 1900:
|
|
Usually you can use netcat to send the request. In that case you should use:
|
|
Hmm…That’s bad! Let’s use another SSDP client:
|
|
Obviously we have found some devices. And because the requests were sent on destination-port = 1900 you won’t see them on burp. This is where ProxyDroid shows its first weakness. In general you’re going to run into troubles if your requests are sent to a port different from 80 or 443. So we need a more generic solution.
Port forwarding
Using iptables I’ll re-route the traffic destinated to some specific port directly to burp.Without any proxies the connection “flows” between the client and the server. Using a proxy between them you’ll have sth like this:
Graphviz code
digraph G { graph [rankdir = LR]; node[shape=record];
  Proxy  [label="{ { <i1> Input: Port | <i2>Input: Data } | <proxy>proxy | { <o1> Output: Port | <o2> Output: Data } }"];
  Client [label="{ { <p1> Source Port | <p2> Data | <p3> Other Headers} | <client>android-client }"];
  Server [label="{ webserver | { <p1> Destination Port | <p2> Data | <p3> Other Headers } }"];


  Client:client -> Proxy [color=red];
  Proxy -> Server [color=red];
}

And this is where NAT comes into play. The 3 major NAT types are described below:
- SNAT
Souce NAT changes the source address/port in the IP header of a packet to sth different. SNAT is commonly done in the POSTROUTING chain, just before the packet will be sent out. That means that everything on the box itself (routing, filtering etc.) will see the packet unchanged. For more detailed reading have a look at netfilter - NAT Howto.
blockdiag code
blockdiag {
  Client [label="Client\n1.1.1.1", shape=cisco.pc];
  NAT [label="NAT\n2.2.2.2", shape=cisco.router];
  Server [label="Server\n3.3.3.3", shape=cisco.www_server];
  CN [label="Packet\n\nFrom: 1.1.1.1:4192\nTo: 3.3.3.3:8080", height=80, width=170, color="orange"];
  NS [label="Packet\n\nFrom: 2.2.2.2:14567\nTo: 3.3.3.3:8080", height=80, width=170, color="orange"];

  NC [label="Packet\n\nFrom: 3.3.3.3:8080\nTo: 1.1.1.1:4192", height=80, width=170, color="lightblue"];
  SN [label="Packet\n\nFrom: 3.3.3.3:8080\nTo: 2.2.2.2:14567", height=80, width=170, color="lightblue"];

  Client -> CN -> NAT [color="orange"];
  NAT -> NS -> Server [color="orange"];
  NAT <- SN <- Server [color="lightblue"];
  Client <- NC <- NAT [color="lightblue"];
}
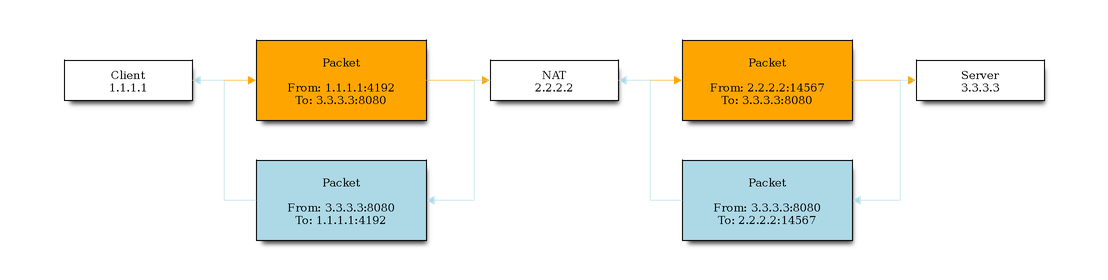
- Client –> Server (orange)
The Client (1.1.1.1) wants to send a request to the Server (3.3.3.3). Therefore a packet is sent from the Client (source port 4192) to the Server (3.3.3.3:8080). On its way to the destination the packet gets modified, so that the source IP address is changed to the address of the NAT “router” (2.2.2.2). Besides that the source port of the packet is changed as well (14567).
- Server –> Client (lightblue)
The Server (3.3.3.3) responds to the request by sending back a packet to the NAT router (2.2.2.2:14567). The NAT router does some mapping and realizes that 2.2.2.2:14567 is mapped to 1.1.1.1:4192. The packet originating from the Server is then once again modified: The source IP address is replaced by the Servers one (3.3.3.3:8080).
- DNAT
Destination NAT changes the destination address/port in the IP header of a packet. This is usually done in the PREROUTING chain, right after the packet has arrived. For my purpose I’ll be using the OUTPUT chain to do DNAT. Since the packets are modified before leaving the network interface
blockdiag code
blockdiag {
  Client [label="Client\n1.1.1.1", shape=cisco.pc];
  NAT [label="NAT\n2.2.2.2", shape=cisco.router];
  Server [label="Server\nx.x.x.x", shape=cisco.www_server];
  CN [label="Packet\n\nFrom: 1.1.1.1:4192\nTo: 3.3.3.3:8080", height=80, width=170, color="orange"];
  NS [label="Packet\n\nFrom: 1.1.1.1:4192\nTo: x.x.x.x:yyyy", height=80, width=170, color="orange"];

  Client -> CN -> NAT [color="orange"];
  NAT -> NS -> Server [color="orange"];
}

- MASQUERADING
SNAT and MASQUERADING are pretty much the same, since they both change the source address as soon as the packets depart the host (POSTROUTING). Masquerading refers to the address translation allowing all the hosts on a (private) network to use another network (like the Internet) at the price of a single IP address. If your external address is variable (per DHCP) then Masquerading is the place to be. If instead your outgoing interface has a static IP address you don’t need it and one can use SNAT.
What is the difference between a Source NAT, Destination NAT and Masquerading?
Port forwarding on the client
Now we’re ready to implement port forwarding on the client. We’ll try to intercept all text-based traffic (like SSDP / HTTP etc.) destinated to port 8000. First of all we’ll add DNAT:
|
|
This will “forward” all host generated traffic destinated at port 1900 to 192.168.1.2:8080 (Burp instance). Recall iptables packet traversal scheme: The rule is being added to the OUTPUT chain before the packet reaches the POSTROUTING chain.
Server listening …
The Server (dornea.nu) will listen for incoming connections on port 8080:
|
|
Client -> Server
On the Client we’ll use curl to access the Server:
|
|
So obviously the packet reached its destination.
Dude, where’s my packet?
Sniffing for packets destinated to port 8000 won’t give you any results:
|
|
While triggering the curl command you won’t be able to see the outgoing packets destinated to http://dornea.nu:8000. While rewriting the IP packet destination, the packet is not passed to the interface the address belongs to. It is handled by the network stack directly (SE answer).
What about Burp?
On burp you won’t see anything. How comes? And this is the point where we come the final conclusion and also the main reason I’ve written this post (sorry for the long prologue :)). And the reason is actually pretty “invisible” and can be found in Burps proxy options:
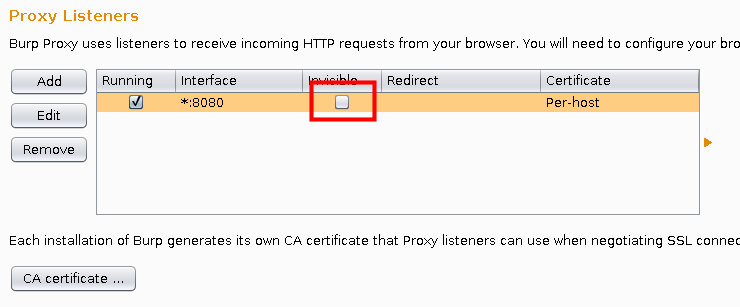
It’s all about Burps invisible proxying. It basically enables proxy support for non-proxy-aware clients to be able to connect directly to the listener (Burp). Editing the proxy options (Request Handling) you’ll find these options:

Make sure you activate “Support invisible proxying”. Afterwards you can trigger curl again to see if it works:
|
|
On burp I’ve seen:
|
|
Perfect!
No iptables?!
Ok, using iptables you’re ready to implement port forwarding. But what if your device does not have iptables or anything similar even installed? I usually root or jailbreak my test devices for better handling but in case you can’t you won’t be able to do NATing on the device itself. In that case maybe a VPN would help. Just install a VPN server on the host running the burp instance and connect your devices to it. This way you should be able to set a HTTP proxy for your devices. I honestly admit I don’t really know if this is going to work for 100%. Test for yourself and let me know. But since this problem affects me as well there’ll be probably another post regarding this issue :). Stay tuned.