In times of NSA, surveillance and data privacy, protecting your data has become an essential part of your every day life. A good understanding of basic principles is half the battle. In this post I just wanted to have look at SSL/TLS from a developer point of view but also from an users one. On the one hand I wanted to use openssl as a CLI utility to inspect and validate X.509 certificates. On the other hand I wanted to have code I could use in my own projects. I’ve found pyOpenSSL to be a quite useful library to use on a regular daily basis. Regardless the programming language you’ll find pretty generic ways of validating the certificates and pinning the presented data. For the sake of simplicity I’ve chosen to analyze Googles SSL certificate. But first let’s start with certificate pinning.
|
|
height has been deprecated.

Installed diagmagic.py. To use it, type:
  %load_ext diagmagic
Installed gvmagic.py. To use it, type:
  %load_ext gvmagic
What is it?
Having to implement certificate pinning most developers have a poor knowledge about it and the impact it could have on an end-user if not done properly. I think MITM attacks are nowadays widely understood (generally speaking) and developers seem to accept the importance of security measurements against this specific type of attacks. Certificate pinning referrs to the authenticity of data and the process of comparing some presented to expected data. Take a look at the OWASP site for a more detailed introduction. But first let’s have a look how client communicates to a server using a secure (SSL/TLS) channel:
|
|
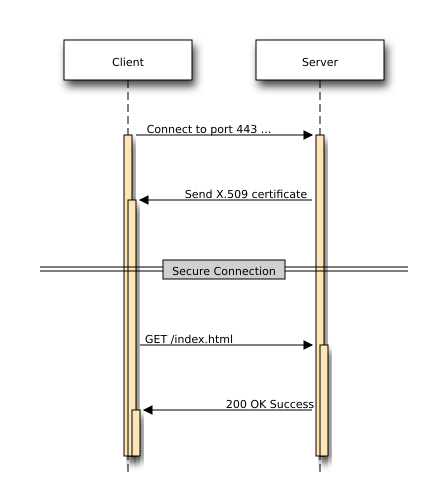
Before establishing the secure connection the client must validate the presented certificate.
Regarding the validation: Here I won’t go into much details because this is a quite complicated story from a technical point of view.
After the successfull validation the authenticity of the server is guaranteed - at least that’s what the client is assuming. Now let’s have a look what happens during a MITM attack:
|
|

As you see the client is presented Eves certificate which is the evil one. Now the client has 2 options:
- trust the presented certificate and hope it’s from the Server
- pin the certificate
In the following I’ll take a closer look what’s inside the certificate and which options one has to do the pinning.
Inside the certificate
A X.509 certificate usually consists of three main components:
- the certificate itself
- certificate signature algorithm
- certificate signature
For the rest of post I’ll be analyzing the SSL certificate of www.google.com. Now let’s get back to work:
Connection settings
|
|
Make connection
|
|
Now that we’ve established the socket connection, we can fetch the certificate and do the analysis.
Fetch the certificate
|
|
You don’t know nothing about ASN.1, DER or PEM? No problem! Just have a look at this great article. But to summarize it: DER is binary format, its structure is called ASN.1. PEM format is Base64 encoded representation of DER.
PEM format
|
|
-----BEGIN CERTIFICATE-----
MIIEdjCCA16gAwIBAgIIX7v8fExu/5IwDQYJKoZIhvcNAQEFBQAwSTELMAkGA1UE
BhMCVVMxEzARBgNVBAoTCkdvb2dsZSBJbmMxJTAjBgNVBAMTHEdvb2dsZSBJbnRl
cm5ldCBBdXRob3JpdHkgRzIwHhcNMTUwNTA2MTAyOTI1WhcNMTUwODA0MDAwMDAw
WjBoMQswCQYDVQQGEwJVUzETMBEGA1UECAwKQ2FsaWZvcm5pYTEWMBQGA1UEBwwN
TW91bnRhaW4gVmlldzETMBEGA1UECgwKR29vZ2xlIEluYzEXMBUGA1UEAwwOd3d3
Lmdvb2dsZS5jb20wggEiMA0GCSqGSIb3DQEBAQUAA4IBDwAwggEKAoIBAQDbQYCq
uMXjaNFVmagkNkToVsTlNpP17Hzps7nJVT+cNcu/bV4mREEG8oRZU1KERHPza3gd
4PmzInZxcMzi90wUoZIQhyMCdCtLDc2cSshJ3TaZM9unjrMzgTT5VhDnoTb72r8W
yqdYvY4wp2cvdfkaLpUirYVYkKww8bMemjXHMzBYHiAdDTLY6sBenM0+t7zfLRTl
t+JTZEx/bK/a7lEkHNFvCn2IW+MYt+668xVYw2TnBhXIJlo0ZrP5Vpa43qIRoykd
4vUVUk3scHyS7XhnDEU/D7IjW6BCWIB4/GrgCMezRTSRPYXufU2aQB9iwAlto7yD
HJW71m3BTUxDaxBnAgMBAAGjggFBMIIBPTAdBgNVHSUEFjAUBggrBgEFBQcDAQYI
KwYBBQUHAwIwGQYDVR0RBBIwEIIOd3d3Lmdvb2dsZS5jb20waAYIKwYBBQUHAQEE
XDBaMCsGCCsGAQUFBzAChh9odHRwOi8vcGtpLmdvb2dsZS5jb20vR0lBRzIuY3J0
MCsGCCsGAQUFBzABhh9odHRwOi8vY2xpZW50czEuZ29vZ2xlLmNvbS9vY3NwMB0G
A1UdDgQWBBSMXZKKlB2MmLIyeqTTdGAZ7y+vRjAMBgNVHRMBAf8EAjAAMB8GA1Ud
IwQYMBaAFErdBhYbvPZotXb1gba7Yhq6WoEvMBcGA1UdIAQQMA4wDAYKKwYBBAHW
eQIFATAwBgNVHR8EKTAnMCWgI6Ahhh9odHRwOi8vcGtpLmdvb2dsZS5jb20vR0lB
RzIuY3JsMA0GCSqGSIb3DQEBBQUAA4IBAQBkJo403MR1GQekBQ5zJCAAcwEuJYn6
oDokSqvR+6Wh6O7L9mBLAkQOkg/uqfGZ8R5KbUSDbnEWl6OboJero8cp9dMnQjck
fZa661zDPoRDWegFm9aZMQLcdnPBi/TI9aEFuUOQLvCk31CrHVFyfSwznBYUZ+Yt
4qxu44/AxEfmLT7p0CF3Y/NvcA2fGRbckj2+3tONI+FTEH/V/SIwRmyXag2/GbPt
RhahlBFXh6VobK8dbFtql6P4+x//7+ze0tXaMRoRsOQfjwWmD6SaA13JJOo8/oBQ
aUYdqnU+Mgkfro7CDpEjOucBzZbsSevm9vPQMhExdju6pKf+nC0bz+7T
-----END CERTIFICATE-----
TEXT format
|
|
{'OCSP': ('http://clients1.google.com/ocsp',),
 'caIssuers': ('http://pki.google.com/GIAG2.crt',),
 'crlDistributionPoints': ('http://pki.google.com/GIAG2.crl',),
 'issuer': ((('countryName', 'US'),),
            (('organizationName', 'Google Inc'),),
            (('commonName', 'Google Internet Authority G2'),)),
 'notAfter': 'Aug  4 00:00:00 2015 GMT',
 'notBefore': 'May  6 10:29:25 2015 GMT',
 'serialNumber': '5FBBFC7C4C6EFF92',
 'subject': ((('countryName', 'US'),),
             (('stateOrProvinceName', 'California'),),
             (('localityName', 'Mountain View'),),
             (('organizationName', 'Google Inc'),),
             (('commonName', 'www.google.com'),)),
 'subjectAltName': (('DNS', 'www.google.com'),),
 'version': 3}
Have a look at this site for great explanations regarding the properties.
From an attackers perspective generating certificates that contain the same data is easy peasy. So while doing the certificate pinning you shouldn’t rely on these values. Furthermore rely on data that can not be manipulated or data that has been generated randomly. Of course there is still a risk with “pseudo-random” data in case of insecure PRNGs. Or don’t you remember this one anymore? :)
Certificate pinning
When it comes to pinning you’ll have different options what to “pin” for. Let’s have a look how this is done using Python, but the procedure should apply to other programming languages as well. First let’s do some conversions and extract data we’re interested in.
|
|
Pin the certificate
You can of course check of the X.509 properties you’ve seen before, but you should not rely on these values. Instead use a digest (e.g. SHA-1, SHA-256 etc.) to fingerprint the certificate. If the generated fingerprint is exactly the one you have expected then you can trust the certificate. However certificates may change at regular time intervals, so you’ll have to adapt your expected fingerprint value every time this happens. Pinning the public key is a much better solution.
|
|
|
|
SHA256 Fingerprint=16:3D:A3:9A:7C:8F:4E:C4:79:59:5E:30:A8:82:2C:A7:58:CD:0A:6B:87:EF:7B:43:10:5A:97:C3:93:90:98:D8
Using this fingerprint you could now verify the authencity of the presented certificate. Besides checking the fingerprint you should check if:
- the certificate is NULL (this happens when the server has no certificate)
- the certificates length > 0
- ? (did i miss sth?)
Pin the public key
I’ll first extract the public key from the certificate and print it in a human readable way.
|
|
Public-Key: (2048 bit)
Modulus:
    00:db:41:80:aa:b8:c5:e3:68:d1:55:99:a8:24:36:
    44:e8:56:c4:e5:36:93:f5:ec:7c:e9:b3:b9:c9:55:
    3f:9c:35:cb:bf:6d:5e:26:44:41:06:f2:84:59:53:
    52:84:44:73:f3:6b:78:1d:e0:f9:b3:22:76:71:70:
    cc:e2:f7:4c:14:a1:92:10:87:23:02:74:2b:4b:0d:
    cd:9c:4a:c8:49:dd:36:99:33:db:a7:8e:b3:33:81:
    34:f9:56:10:e7:a1:36:fb:da:bf:16:ca:a7:58:bd:
    8e:30:a7:67:2f:75:f9:1a:2e:95:22:ad:85:58:90:
    ac:30:f1:b3:1e:9a:35:c7:33:30:58:1e:20:1d:0d:
    32:d8:ea:c0:5e:9c:cd:3e:b7:bc:df:2d:14:e5:b7:
    e2:53:64:4c:7f:6c:af:da:ee:51:24:1c:d1:6f:0a:
    7d:88:5b:e3:18:b7:ee:ba:f3:15:58:c3:64:e7:06:
    15:c8:26:5a:34:66:b3:f9:56:96:b8:de:a2:11:a3:
    29:1d:e2:f5:15:52:4d:ec:70:7c:92:ed:78:67:0c:
    45:3f:0f:b2:23:5b:a0:42:58:80:78:fc:6a:e0:08:
    c7:b3:45:34:91:3d:85:ee:7d:4d:9a:40:1f:62:c0:
    09:6d:a3:bc:83:1c:95:bb:d6:6d:c1:4d:4c:43:6b:
    10:67
Exponent: 65537 (0x10001)
Let’s check that with openssl output:
|
|
Modulus=DB4180AAB8C5E368D15599A8243644E856C4E53693F5EC7CE9B3B9C9553F9C35CBBF6D5E26444106F284595352844473F36B781DE0F9B322767170CCE2F74C14A19210872302742B4B0DCD9C4AC849DD369933DBA78EB3338134F95610E7A136FBDABF16CAA758BD8E30A7672F75F91A2E9522AD855890AC30F1B31E9A35C73330581E201D0D32D8EAC05E9CCD3EB7BCDF2D14E5B7E253644C7F6CAFDAEE51241CD16F0A7D885BE318B7EEBAF31558C364E70615C8265A3466B3F95696B8DEA211A3291DE2F515524DEC707C92ED78670C453F0FB2235BA042588078FC6AE008C7B34534913D85EE7D4D9A401F62C0096DA3BC831C95BBD66DC14D4C436B1067
|
|
    0:d=0  hl=4 l= 290 cons: SEQUENCE
    4:d=1  hl=2 l=  13 cons: SEQUENCE
    6:d=2  hl=2 l=   9 prim: OBJECT            :rsaEncryption
   17:d=2  hl=2 l=   0 prim: NULL
   19:d=1  hl=4 l= 271 prim: BIT STRING
      0000 - 00 30 82 01 0a 02 82 01-01 00 db 41 80 aa b8 c5   .0.........A....
      0010 - e3 68 d1 55 99 a8 24 36-44 e8 56 c4 e5 36 93 f5   .h.U..$6D.V..6..
      0020 - ec 7c e9 b3 b9 c9 55 3f-9c 35 cb bf 6d 5e 26 44   .|....U?.5..m^&D
      0030 - 41 06 f2 84 59 53 52 84-44 73 f3 6b 78 1d e0 f9   A...YSR.Ds.kx...
      0040 - b3 22 76 71 70 cc e2 f7-4c 14 a1 92 10 87 23 02   ."vqp...L.....#.
      0050 - 74 2b 4b 0d cd 9c 4a c8-49 dd 36 99 33 db a7 8e   t+K...J.I.6.3...
      0060 - b3 33 81 34 f9 56 10 e7-a1 36 fb da bf 16 ca a7   .3.4.V...6......
      0070 - 58 bd 8e 30 a7 67 2f 75-f9 1a 2e 95 22 ad 85 58   X..0.g/u...."..X
      0080 - 90 ac 30 f1 b3 1e 9a 35-c7 33 30 58 1e 20 1d 0d   ..0....5.30X. ..
      0090 - 32 d8 ea c0 5e 9c cd 3e-b7 bc df 2d 14 e5 b7 e2   2...^..>...-....
      00a0 - 53 64 4c 7f 6c af da ee-51 24 1c d1 6f 0a 7d 88   SdL.l...Q$..o.}.
      00b0 - 5b e3 18 b7 ee ba f3 15-58 c3 64 e7 06 15 c8 26   [.......X.d....&
      00c0 - 5a 34 66 b3 f9 56 96 b8-de a2 11 a3 29 1d e2 f5   Z4f..V......)...
      00d0 - 15 52 4d ec 70 7c 92 ed-78 67 0c 45 3f 0f b2 23   .RM.p|..xg.E?..#
      00e0 - 5b a0 42 58 80 78 fc 6a-e0 08 c7 b3 45 34 91 3d   [.BX.x.j....E4.=
      00f0 - 85 ee 7d 4d 9a 40 1f 62-c0 09 6d a3 bc 83 1c 95   ..}M.@.b..m.....
      0100 - bb d6 6d c1 4d 4c 43 6b-10 67 02 03 01 00 01      ..m.MLCk.g.....
So one could also check the RSA modulus against an expected value. Furthermore you could hash the whole public key and then check values:
|
|
618a8d05fce8d0f8f790e0a2fbaaf739ff7049e7da087520e81a31d0af81513a /tmp/pyopenssl/pubkey.pem
Validate certificate
Get the trust chain:
|
|
 0 s:/C=US/ST=California/L=Mountain View/O=Google Inc/CN=www.google.com
   i:/C=US/O=Google Inc/CN=Google Internet Authority G2
 1 s:/C=US/O=Google Inc/CN=Google Internet Authority G2
   i:/C=US/O=GeoTrust Inc./CN=GeoTrust Global CA
 2 s:/C=US/O=GeoTrust Inc./CN=GeoTrust Global CA
   i:/C=US/O=Equifax/OU=Equifax Secure Certificate Authority


depth=2 C = US, O = GeoTrust Inc., CN = GeoTrust Global CA
verify error:num=20:unable to get local issuer certificate
DONE
|
|

First of all you’ll notice that there has been some problem regarding the validation:
verify error:num=20:unable to get local issuer certificate
This has to do with the fact that openssl doesn’t provide a list of trusted certs by default. You’ll have to specify it manually:
|
|
Verify return code: 0 (ok)
Ok, so that looks much better. Now let’s verify the chain:
|
|
error 20 at 0 depth lookup:unable to get local issuer certificate
Hmm…Strange error message, even though I’ve specified the path where to lookup the certs. Another try:
|
|
error 20 at 0 depth lookup:unable to get local issuer certificate
Strange! After some Googling, I’ve found this. So let’s give it another try:
|
|
error 20 at 0 depth lookup:unable to get local issuer certificate
If you have any ideas how to solve this, just drop me a line!
Conclusion
Certificate pinning is a useful step towards authenticity verfication of a X.509 certificate. Keep in mind that MITM attacks are no rarity anymore and should be always be taken into consideration. Do not just validate the certificate. Make sure it is the one you’ve been expecting while connecting to your site/SSL-backend. Use fingerprints (in general digests) which you can always compute on the presented information and compare it against an expected value.