Continuing my admin series this time I’d like to setup a VPN using OpenVPN as user-based VPN solution. Unlike IPSec solutions which require IPSec on both (server and client) sides, securing the VPN tunnel by OpenSSL is a more preferable option.
In this post I’ll try to show which steps have to be taken in order to:
- secure the communication channel
- use up-to-date (and secure!) TLS configurations
- prevent information leaks when the VPN tunnel is down
At least for the last one some additional steps are required to route your traffic only through the VPN tunnel. As a client you don’t want your connection to be “downgraded” (in terms of security) without even realizing it. That’s why you might want to restrict your routes and allow outbound connection only through the (virtual) interface dedicated to the VPN. How this is done and which methods exist, is covered later on.
Revision
#
| Date |
Description |
| 2015-11-17 |
First release |
| 2015-11-19 |
Improved ufw script |
| 2015-11-24 |
Added iptables and initialization script. The firewall rules are now set by iptables. |
Create certificates
#
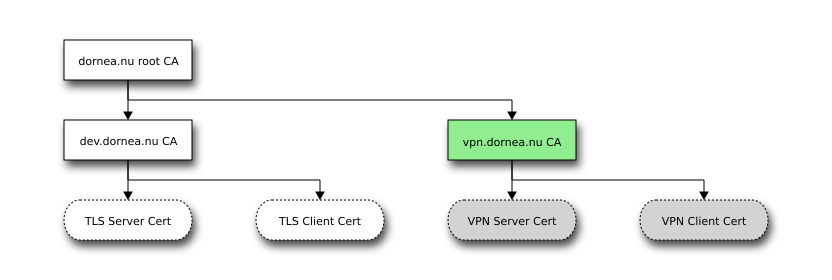
In the last post I’ve already created the VPN CA and also issued certificates for server and client. Perhaps you do remember the PKI:
 1
 2
 3
 4
 5
 6
 7
 8
 9
10
11
12
13
14
15
16
17
18
19
20
21
22
23
24
25
26
27
28
29
30
|
%%blockdiag
# <!-- collapse=True -->↔
blockdiag {
  // Define orientation
  orientation = portrait;

  // Define class (list of attributes)
  class emphasis [color = pink, style = dashed];
  class blackline [color = black, style = dotted];
  class blue [color = lightblue];
  class active [color = lightgreen];
  class inactive [color = lightgrey];

  Root_CA [label = "dornea.nu root CA"];
  Signing_CA2 [label = "dev.dornea.nu CA"];
  Signing_CA3 [class = active, label = "vpn.dornea.nu CA"];
  TLS_Server_CA [label = "TLS Server Cert", shape = flowchart.terminator, style = dotted];
  TLS_Client_CA [label = "TLS Client Cert", shape = flowchart.terminator, style = dotted];
  VPN_Server_CA [class = inactive, label = "VPN Server Cert", shape = flowchart.terminator, style = dotted];
  VPN_Client_CA [class = inactive, label = "VPN Client Cert", shape = flowchart.terminator, style = dotted];

  Root_CA -> Signing_CA2;
  Root_CA -> Signing_CA3;

  Signing_CA2 -> TLS_Server_CA;
  Signing_CA2 -> TLS_Client_CA;

  Signing_CA3 -> VPN_Server_CA;
  Signing_CA3 -> VPN_Client_CA;
}
|
My solution is more a DIY one. If you want to use a more convient one, have a look at easy-rsa.
There are several steps aimed at successfully configuring your OpenVPN server.
Basic configuration
#
1
|
root@debian:/etc/openvpn# useradd openvpn
|
- Specify which interface the server should listen on
1
2
3
4
|
# Which local IP address should OpenVPN
# listen on? (optional)
;local a.b.c.d
local 192.168.178.163
|
- Specify protocol and port OpenVPN should initiate connections over
 1
 2
 3
 4
 5
 6
 7
 8
 9
10
|
# Which TCP/UDP port should OpenVPN listen on?
# If you want to run multiple OpenVPN instances
# on the same machine, use a different port
# number for each one.  You will need to
# open up this port on your firewall.
port 443

# TCP or UDP server?
;proto tcp
proto udp
|
- Specify VPN subnet where to assign IP addresses to clients from
1
2
3
4
5
6
7
8
|
# Configure server mode and supply a VPN subnet
# for OpenVPN to draw client addresses from.
# The server will take 10.8.0.1 for itself,
# the rest will be made available to clients.
# Each client will be able to reach the server
# on 10.8.0.1. Comment this line out if you are
# ethernet bridging. See the man page for more info.
server 10.66.0.0 255.255.255.0
|
Secure communication channel
#
Add DH params
#
1
2
3
4
|
root@debian:/etc/openvpn# openssl dhparam -out dh2048.pem 2048
Generating DH parameters, 2048 bit long safe prime, generator 2
This is going to take a long time
...
|
And now add it to the config file:
1
2
3
4
|
# Diffie hellman parameters.
# Generate your own with:
#   openssl dhparam -out dh2048.pem 2048
dh /etc/openvpn/dh2048.pem
|
HMAC firewall using tls-auth
#
1
|
root@debian:/etc/openvpn# openvpn --genkey --secret ta.key
|
And add it to the config file:
 1
 2
 3
 4
 5
 6
 7
 8
 9
10
11
12
|
# For extra security beyond that provided
# by SSL/TLS, create an "HMAC firewall"
# to help block DoS attacks and UDP port flooding.
#
# Generate with:
#   openvpn --genkey --secret ta.key
#
# The server and each client must have
# a copy of this key.
# The second parameter should be '0'
# on the server and '1' on the clients.
tls-auth /etc/openvpn/ta.key 0 # This file is secret
|
Strong cryptographic cipher
#
First let’s have a look at the available ciphers (filter only those with 256 bit key length:
 1
 2
 3
 4
 5
 6
 7
 8
 9
10
11
|
root@debian:/etc/openvpn# openvpn --show-ciphers | grep 256
AES-256-CBC 256 bit default key (fixed)
AES-256-OFB 256 bit default key (fixed) (TLS client/server mode)
AES-256-CFB 256 bit default key (fixed) (TLS client/server mode)
AES-256-CFB1 256 bit default key (fixed) (TLS client/server mode)
AES-256-CFB8 256 bit default key (fixed) (TLS client/server mode)
CAMELLIA-256-CBC 256 bit default key (fixed)
CAMELLIA-256-CFB 256 bit default key (fixed) (TLS client/server mode)
CAMELLIA-256-CFB1 256 bit default key (fixed) (TLS client/server mode)
CAMELLIA-256-CFB8 256 bit default key (fixed) (TLS client/server mode)
CAMELLIA-256-OFB 256 bit default key (fixed) (TLS client/server mode)
|
I’ll select AES-256-CBC:
1
2
3
4
5
6
7
|
# Select a cryptographic cipher.
# This config item must be copied to
# the client config file as well.
;cipher BF-CBC        # Blowfish (default)
;cipher AES-128-CBC   # AES
;cipher DES-EDE3-CBC  # Triple-DES
cipher AES-256-CBC
|
Select TLS cipher
#
In order to guarantee FPS I’ll be using a Diffie–Hellman key exchange-based PFS like DHE-[…] or an elliptic curve Diffie–Hellman-based PFS like ECDHE-[…]. As stated here OpenVPN does not support TLS-ECDHE-* or more exotic cipher-suites as there is no elliptic curve support currently.
Let’s have a look at the available TLS ciphers:
 1
 2
 3
 4
 5
 6
 7
 8
 9
10
11
12
13
14
15
16
17
18
19
20
21
22
23
|
root@debian:/etc/openvpn# openvpn --show-tls | grep TLS-DHE
TLS-DHE-DSS-WITH-AES-256-GCM-SHA384
TLS-DHE-RSA-WITH-AES-256-GCM-SHA384
TLS-DHE-RSA-WITH-AES-256-CBC-SHA256
TLS-DHE-DSS-WITH-AES-256-CBC-SHA256
TLS-DHE-RSA-WITH-AES-256-CBC-SHA
TLS-DHE-DSS-WITH-AES-256-CBC-SHA
TLS-DHE-RSA-WITH-CAMELLIA-256-CBC-SHA
TLS-DHE-DSS-WITH-CAMELLIA-256-CBC-SHA
TLS-DHE-DSS-WITH-AES-128-GCM-SHA256
TLS-DHE-RSA-WITH-AES-128-GCM-SHA256
TLS-DHE-RSA-WITH-AES-128-CBC-SHA256
TLS-DHE-DSS-WITH-AES-128-CBC-SHA256
TLS-DHE-RSA-WITH-AES-128-CBC-SHA
TLS-DHE-DSS-WITH-AES-128-CBC-SHA
TLS-DHE-RSA-WITH-SEED-CBC-SHA
TLS-DHE-DSS-WITH-SEED-CBC-SHA
TLS-DHE-RSA-WITH-CAMELLIA-128-CBC-SHA
TLS-DHE-DSS-WITH-CAMELLIA-128-CBC-SHA
TLS-DHE-RSA-WITH-3DES-EDE-CBC-SHA
TLS-DHE-DSS-WITH-3DES-EDE-CBC-SHA
TLS-DHE-RSA-WITH-DES-CBC-SHA
TLS-DHE-DSS-WITH-DES-CBC-SHA
|
Add some ciphers to the config file:
1
2
|
# Select a TLS cipher
tls-cipher TLS-DHE-RSA-WITH-AES-256-CBC-SHA256:TLS-DHE-RSA-WITH-AES-128-CBC-SHA256:TLS-DHE-DSS-WITH-AES-128-CBC-SHA256:TLS-DHE-RSA-WITH-AES-128-CBC-SHA
|
Additionally you can specify which TLS version should be used
1
2
|
# Use TLS 1.2 as minimum requirement
tls-version-min 1.2
|
Use SHA2 for message authentication
#
In case you don’t have performance issues, change the the MAC digest to:
Verify revoked client certs
#
Also make sure that no client with a revoked certificate is allowed to connect to the VPN server:
1
|
crl-verify path-to/your-ca-crl.pem
|
Route all client traffic (incl. DNS) through VPN tunnel
#
1
|
push "redirect-gateway def1"
|
Pushing this option to the clients will route all client originating traffic through the OpenVPN server. The server however must know how to deal with this traffic by NATing it to the Internet or passing it to some proxy. DNS traffic will be routed as well. You may want to push some DNS server to the clients, such as:
1
2
|
push "dhcp-option DNS 208.67.222.222"
push "dhcp-option DNS 8.8.8.8"
|
Make other subnets available to the clients
#
In order to allow VPN clients to access subnets behind the VPN-gateway you’ll have to advertise these subnets to the clients. One example:
1
2
3
4
5
6
7
8
|
# Push routes to the client to allow it
# to reach other private subnets behind
# the server.  Remember that these
# private subnets will also need
# to know to route the OpenVPN client
# address pool (10.8.0.0/255.255.255.0)
# back to the OpenVPN server.
push "route 192.168.178.0 255.255.255.0"
|
More on Routing in the section below.
Harden server
#
Move it to chroot
#
In a chroot environment a process/daemon would not be able to access any part of the system’s filesystem except for the directory it is currently in.
1
2
|
root@debian:/etc/openvpn# mkdir -p /home/openvpn/tmp
root@debian:/etc/openvpn# chown -R openvpn:openvpn /home/openvpn
|
Also add to the config file:
1
2
|
# Lock down daemon to chroot jail
chroot jail
|
Don’t run as root
#
Reduce OpenVPN’s server privileges:
1
2
3
4
5
6
7
|
# It's a good idea to reduce the OpenVPN
# daemon's privileges after initialization.
#
# You can uncomment this out on
# non-Windows systems.
user openvpn
group openvpn
|
Unprivileged mode
#
While being able to operate on a tun device, the OpenVPN daemon should be able to access it in an unprivileged mode. Internally sudo is being used to call iproute which will apply the interface properties and add/delete/modify routing information. For getting this to work I’ll use the described steps in the official documentation:
1
2
3
4
|
root@debian:/etc/openvpn# cat /usr/local/sbin/unpriv-ip
#!/bin/sh
sudo /sbin/ip $*
root@debian:/etc/openvpn# chmod a+x /usr/local/sbin/unpriv-ip
|
- Allow
user1 to execute /sbin/ip (in /etc/sudoers):
1
2
|
# Allow user1 nobody to execute /sbin/ip
openvpn ALL=(ALL)  NOPASSWD: /sbin/ip
|
- Change OpenVPN configuration
1
2
|
# Set  alternate command to execute instead of default iproute2 command.
iproute /usr/local/sbin/unpriv-ip
|
Check file permissions
#
Also check the file permissions for the file inside /etc/openvpn:
1
|
root@debian:/etc/openvpn# chmod go-rwx /etc/openvpn/ta.key /etc/openvpn/dh2048.pem /etc/openvpn/certs/raspberry_pi.p12
|
Disable password caching
#
You might get some warning like
WARNING: this configuration may cache passwords in memory – use the auth-nocache option to prevent this
Then add it fo the conf:
1
2
|
# Prevent password caching
auth-nocache
|
Start server
#
Let’s give it a try:
 1
 2
 3
 4
 5
 6
 7
 8
 9
10
11
12
13
14
15
16
17
18
19
20
|
root@debian:/etc/openvpn# openvpn server.conf
Tue Nov 17 17:30:12 2015 OpenVPN 2.3.4 arm-unknown-linux-gnueabihf [SSL (OpenSSL)] [LZO] [EPOLL] [PKCS11] [MH] [IPv6] built on Dec  5 2014
...

Tue Nov 17 17:30:16 2015 Control Channel Authentication: using 'ta.key' as a OpenVPN static key file
Tue Nov 17 17:30:16 2015 Outgoing Control Channel Authentication: Using 512 bit message hash 'SHA512' for HMAC authentication
Tue Nov 17 17:30:16 2015 Incoming Control Channel Authentication: Using 512 bit message hash 'SHA512' for HMAC authentication
Tue Nov 17 17:30:16 2015 Socket Buffers: R=[163840->131072] S=[163840->131072]
Tue Nov 17 17:30:16 2015 ROUTE_GATEWAY 192.168.178.1/255.255.255.0 IFACE=eth0 HWADDR=b8:27:eb:5c:0a:5d
Tue Nov 17 17:30:16 2015 TUN/TAP device tun0 opened
Tue Nov 17 17:30:16 2015 TUN/TAP TX queue length set to 100
Tue Nov 17 17:30:16 2015 do_ifconfig, tt->ipv6=0, tt->did_ifconfig_ipv6_setup=0
Tue Nov 17 17:30:16 2015 /usr/local/sbin/unpriv-ip link set dev tun0 up mtu 1500
Tue Nov 17 17:30:16 2015 /usr/local/sbin/unpriv-ip addr add dev tun0 local 10.66.0.1 peer 10.66.0.2
Tue Nov 17 17:30:17 2015 /usr/local/sbin/unpriv-ip route add 10.66.0.0/24 via 10.66.0.2
Tue Nov 17 17:30:17 2015 chroot to '/home/openvpn' and cd to '/' succeeded
Tue Nov 17 17:30:17 2015 GID set to openvpn
Tue Nov 17 17:30:17 2015 UID set to openvpn
...
Tue Nov 17 17:30:17 2015 Initialization Sequence Completed
|
So everything seemed to work. Let’s check some things:
1
2
|
root@debian:/home/victor# ps -efl | grep openvpn
4 S openvpn   9930  1633  0  80   0 -  1356  e0778 17:30 pts/1    00:00:00 openvpn server.conf
|
1
2
3
4
5
|
root@debian:/home/victor# lsof | grep 9930
openvpn    9930         openvpn  cwd       DIR      179,2     4096        101 /home/openvpn
openvpn    9930         openvpn  rtd       DIR      179,2     4096        101 /home/openvpn

...
|
1
2
|
root@debian:/home/openvpn# netstat -uptan | grep 443
udp        0      192.168.178.163:443             0.0.0.0:*                           9930/openvpn
|
Looks good.
Basic configuration
#
Let’s add the basic stuff:
- Specify we’re operating in client mode
1
2
3
4
|
# Specify that we are a client and that we
# will be pulling certain config file directives
# from the server.
client
|
- Specify TUN/TAP device for the client
1
2
3
4
5
6
7
|
 Use the same setting as you are using on
# the server.
# On most systems, the VPN will not function
# unless you partially or fully disable
# the firewall for the TUN/TAP interface.
;dev tap
dev tun
|
 1
 2
 3
 4
 5
 6
 7
 8
 9
10
11
|
# Are we connecting to a TCP or
# UDP server?  Use the same setting as
# on the server.
;proto tcp
proto udp

# The hostname/IP and port of the server.
# You can have multiple remote entries
# to load balance between the servers.
;remote my-server-1 1194
remote 10.0.1.169 443
|
Secure communication channel
#
- Specify previously generated client certificate and key
1
2
3
4
5
6
7
8
9
|
 SSL/TLS parms.
# See the server config file for more
# description.  It's best to use
# a separate .crt/.key file pair
# for each client.  A single ca
# file can be used for all clients.
ca vpn-ca.crt
cert victor.crt
key victor.key
|
- Verify server certificate
 1
 2
 3
 4
 5
 6
 7
 8
 9
10
11
12
13
|
# Verify server certificate by checking that the
# certicate has the correct key usage set.
# This is an important precaution to protect against
# a potential attack discussed here:
#  http://openvpn.net/howto.html#mitm
#
# To use this feature, you will need to generate
# your server certificates with the keyUsage set to
#   digitalSignature, keyEncipherment
# and the extendedKeyUsage to
#   serverAuth
# EasyRSA can do this for you.
remote-cert-tls server
|
1
|
verify-x509-name 'C=NU, O=dornea.nu, OU=dornea.nu Root CA, CN=vpn.dornea.nu' subject
|
- Use tls-auth key (make sure you use the same one as on the server)
1
2
3
|
# If a tls-auth key is used on the server
# then every client must also have the key.
tls-auth ta.key 1
|
- Select cryptographic cipher (same as on the server)
1
2
3
4
|
# Select a cryptographic cipher.
# If the cipher option is used on the server
# then you must also specify it here.
cipher cipher AES-256-CFB
|
Test connection
#
- Initial try (with errors, see below)
 1
 2
 3
 4
 5
 6
 7
 8
 9
10
|
OpenVPN 2.3_git [git:master/60fd44e501f20024+] x86_64-unknown-linux-gnu [SSL (OpenSSL)] [LZO] [SNAPPY] [LZ4] [EPOLL] [MH] [IPv6] built on Jun 11 2015
library versions: OpenSSL 1.0.2d 9 Jul 2015, LZO 2.09
Enter Private Key Password: ******************
...
VERIFY ERROR: depth=2, error=self signed certificate in certificate chain: C=NU, O=dornea.nu, OU=dornea.nu Root CA, CN=dornea.nu Root CA
OpenSSL: error:14090086:SSL routines:ssl3_get_server_certificate:certificate verify failed
TLS_ERROR: BIO read tls_read_plaintext error
TLS Error: TLS object -> incoming plaintext read error
TLS Error: TLS handshake failed
...
|
We can see that the certificate verification has failed. So the client is not able to verify the certificate presented by the server because it doesn’t have the root cert. Let’s adapt the config:
1
2
3
4
|
# SSL/TLS parms.
...
ca vpn-ca-chain.pem
...
|
Give it another try:
 1
 2
 3
 4
 5
 6
 7
 8
 9
10
11
12
13
14
15
16
17
18
19
20
21
22
23
24
25
26
27
28
29
30
31
32
33
34
35
36
37
38
39
40
41
42
43
44
45
46
47
48
49
50
|
OpenVPN 2.3_git [git:master/60fd44e501f20024+] x86_64-unknown-linux-gnu [SSL (OpenSSL)] [LZO] [SNAPPY] [LZ4] [EPOLL] [MH] [IPv6] built on Jun 11 2015
library versions: OpenSSL 1.0.2d 9 Jul 2015, LZO 2.09
NOTE: the current --script-security setting may allow this configuration to call user-defined scripts
Enter Private Key Password: ******************
WARNING: this configuration may cache passwords in memory -- use the auth-nocache option to prevent this
Control Channel Authentication: using 'ta.key' as a OpenVPN static key file
Outgoing Control Channel Authentication: Using 512 bit message hash 'SHA512' for HMAC authentication
Incoming Control Channel Authentication: Using 512 bit message hash 'SHA512' for HMAC authentication
TCP/UDP: Preserving recently used remote address: [AF_INET]<vpn-server>:80
Socket Buffers: R=[212992->131072] S=[212992->131072]
UDP link local: (not bound)
UDP link remote: [AF_INET]<vpn-server>:80
TLS: Initial packet from [AF_INET]<vpn-server>, sid=d4f744bb e391d690
VERIFY OK: depth=2, C=NU, O=dornea.nu, OU=dornea.nu Root CA, CN=dornea.nu Root CA
VERIFY OK: depth=1, C=NU, O=dornea.nu, OU=dornea.nu Root CA, CN=vpn.dornea.nu CA
Validating certificate key usage
++ Certificate has key usage  00a0, expects 00a0
VERIFY KU OK
Validating certificate extended key usage
++ Certificate has EKU (str) TLS Web Server Authentication, expects TLS Web Server Authentication
VERIFY EKU OK
VERIFY X509NAME OK: C=NU, ST=/dev/null, L=/dev/random, O=dornea.nu, OU=VPN, CN=vpn.dornea.nu
VERIFY OK: depth=0, C=NU, ST=/dev/null, L=/dev/random, O=dornea.nu, OU=VPN, CN=vpn.dornea.nu
Data Channel Encrypt: Cipher 'AES-256-CBC' initialized with 256 bit key
Data Channel Encrypt: Using 512 bit message hash 'SHA512' for HMAC authentication
Data Channel Decrypt: Cipher 'AES-256-CBC' initialized with 256 bit key
Data Channel Decrypt: Using 512 bit message hash 'SHA512' for HMAC authentication
Control Channel: TLSv1.2, cipher TLSv1/SSLv3 DHE-RSA-AES256-SHA256, 4096 bit RSA
[vpn.dornea.nu] Peer Connection Initiated with [AF_INET]<vpn-server>:80
SENT CONTROL [vpn.dornea.nu]: 'PUSH_REQUEST' (status=1)
PUSH: Received control message: 'PUSH_REPLY,route 192.168.178.0 255.255.255.0,redirect-gateway def1,dhcp-option DNS 208.67.222.222,dhcp-option DNS 8.8.8.8,route 10.66.0.1,topology net30,ping 10,ping-restart 120,ifconfig 10.66.0.6 10.66.0.5'
OPTIONS IMPORT: timers and/or timeouts modified
OPTIONS IMPORT: --ifconfig/up options modified
OPTIONS IMPORT: route options modified
OPTIONS IMPORT: --ip-win32 and/or --dhcp-option options modified
ROUTE_GATEWAY 192.168.178.1/255.255.255.0 IFACE=wlan0 HWADDR=3c:77:e6:18:f9:65
TUN/TAP device tun0 opened
TUN/TAP TX queue length set to 100
do_ifconfig, tt->ipv6=0, tt->did_ifconfig_ipv6_setup=0
/usr/bin/ip link set dev tun0 up mtu 1500
/usr/bin/ip addr add dev tun0 local 10.66.0.6 peer 10.66.0.5
/etc/openvpn/update-resolv-conf tun0 1500 1602 10.66.0.6 10.66.0.5 init
2.222

/usr/bin/ip route add <vpn-server>/32 via 192.168.178.1
/usr/bin/ip route add 0.0.0.0/1 via 10.66.0.5
/usr/bin/ip route add 128.0.0.0/1 via 10.66.0.5
/usr/bin/ip route add 192.168.178.0/24 via 10.66.0.5
/usr/bin/ip route add 10.66.0.1/32 via 10.66.0.5
Initialization Sequence Completed
|
Looks good. What about the server?
 1
 2
 3
 4
 5
 6
 7
 8
 9
10
11
12
13
14
15
16
|
TLS: Initial packet from [AF_INET]10.0.1.1:59824, sid=230b4633 1fb1bfae
VERIFY OK: depth=2, C=NU, O=dornea.nu, OU=dornea.nu Root CA, CN=dornea.nu Root CA
VERIFY OK: depth=1, C=NU, O=dornea.nu, OU=dornea.nu Root CA, CN=vpn.dornea.nu CA
VERIFY OK: depth=0, C=NU, ST=/dev/null, L=/dev/random, O=dornea.nu, OU=vpn.dornea.nu, CN=Victor Dorneanu
Data Channel Encrypt: Cipher 'AES-256-CFB' initialized with 256 bit key
Data Channel Encrypt: Using 160 bit message hash 'SHA1' for HMAC authentication
Data Channel Decrypt: Cipher 'AES-256-CFB' initialized with 256 bit key
Data Channel Decrypt: Using 160 bit message hash 'SHA1' for HMAC authentication
Control Channel: TLSv1.2, cipher TLSv1/SSLv3 DHE-RSA-AES256-GCM-SHA384, 4096 bit RSA
[Victor Dorneanu] Peer Connection Initiated with [AF_INET]10.0.1.1:59824
Victor Dorneanu/10.0.1.1:59824 MULTI_sva: pool returned IPv4=10.66.0.6, IPv6=(Not enabled)
Victor Dorneanu/10.0.1.1:59824 MULTI: Learn: 10.66.0.6 -> Victor Dorneanu/10.0.1.1:59824
Victor Dorneanu/10.0.1.1:59824 MULTI: primary virtual IP for Victor Dorneanu/10.0.1.1:59824: 10.66.0.6
Victor Dorneanu/10.0.1.1:59824 PUSH: Received control message: 'PUSH_REQUEST'
Victor Dorneanu/10.0.1.1:59824 send_push_reply(): safe_cap=940
Victor Dorneanu/10.0.1.1:59824 SENT CONTROL [Victor Dorneanu]: 'PUSH_REPLY,route 10.66.0.1,topology net30,ping 10,ping-restart 120,ifconfig 10.66.0.6 10.66.0.5' (status=1)
|
Perfect!
 1
 2
 3
 4
 5
 6
 7
 8
 9
10
|
$ sudo nmap -sU 192.168.178.163 -p 443

Starting Nmap 6.47 ( http://nmap.org ) at 2015-11-11 20:24 CET
Nmap scan report for debian.local (192.168.178.163)
Host is up (0.00048s latency).
PORT    STATE  SERVICE
443/tcp closed https
MAC Address: 52:54:00:E5:01:E4 (QEMU Virtual NIC)

Nmap done: 1 IP address (1 host up) scanned in 0.14 seconds
|
So tls-auth seems to work.
Routing
#
 1
 2
 3
 4
 5
 6
 7
 8
 9
10
11
12
13
14
15
16
17
18
19
20
21
22
23
24
25
26
27
28
|
%%nwdiag
# <!-- collapse=True -->↔

    client              [shape = "cisco.pc"];
    internet            [shape = "cloud"];

    client -- internet;
    internet -- gw;
    gw [label = "Server"];
    #internet -- gw1;
    #internet -- gw;

    network vpn-net {
        address = "10.66.0.0/24"
        gw        [address = ".1", shape = cisco.vpn_gateway];
        #victor    [address = ".4", shape = cisco.pc];

    }
    network home-net {
        address = "192.168.178.0/24"

        gw        [address = ".2"];
        #router    [address = ".1", label = "R", class = obj_router];
        raspberry [address = ".24", label = "Laptop", class = obj_workstation];
        storage   [address = ".25", label = "Storage", class = obj_storage];

    }
}
|
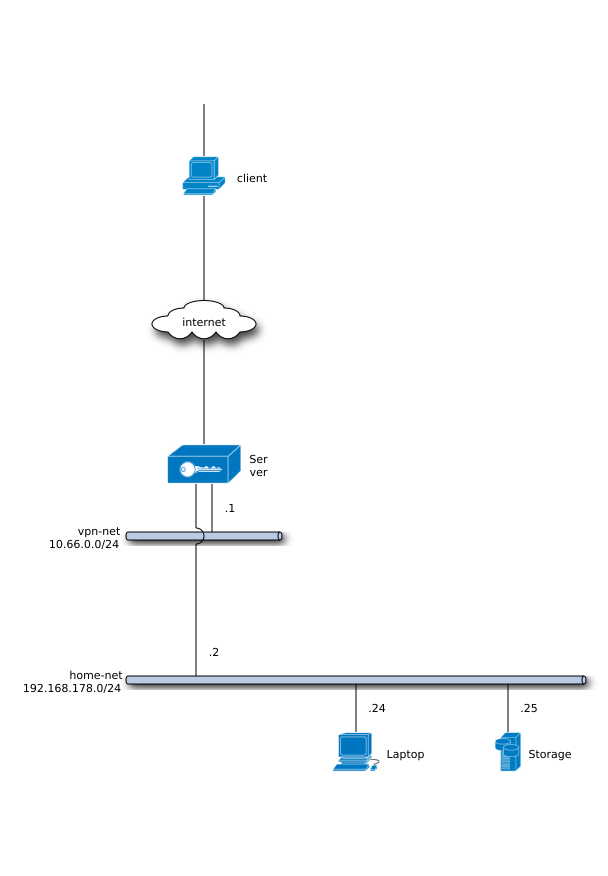
We have a typical road-warrior use case where a single client connects to a remote subnet using a VPN. Afer sucessfully establishing the VPN connection the client will be part of the vpn-net subnet:
 1
 2
 3
 4
 5
 6
 7
 8
 9
10
11
12
13
14
15
16
17
18
19
20
21
22
23
24
25
26
27
28
29
30
31
32
33
34
35
36
37
38
39
40
|
%%nwdiag
# <!-- collapse=True -->
 nwdiag {
    class obj_old       [color = lighgray,style = dotted];
    class obj_new       [color = lightblue,style = dotted];
    class obj_null      [style = dotted,stacked];
    class obj_router    [shape = cisco.router];
    class obj_l2sw      [shape = cisco.layer_2_remote_switch];
    class obj_fw        [shape = cisco.firewall];
    class obj_wlan      [shape = cisco.wireless_router];
    class obj_pc        [shape = cisco.pc];
    class obj_mobile    [shape = cisco.pda];
    class obj_workstation [shape = cisco.workstation];
    class obj_storage   [shape = cisco.storage_server];
    class obj_web       [shape = cisco.web_cluster];

    client              [shape = "cisco.pc"];
    #internet            [shape = "cloud"];

    #internet -- gw;
    gw [label = "Server"];
    #internet -- gw1;
    #internet -- gw;

    network vpn-net {
        address = "10.66.0.0/24"
        gw        [address = ".1", shape = cisco.vpn_gateway];
        client    [address = ".4", shape = cisco.pc];

    }
    network home-net {
        address = "192.168.178.0/24"

        gw        [address = ".2"];
        #router    [address = ".1", label = "R", class = obj_router];
        raspberry [address = ".24", label = "Laptop", class = obj_workstation];
        storage   [address = ".25", label = "Storage", class = obj_storage];

    }
}
|
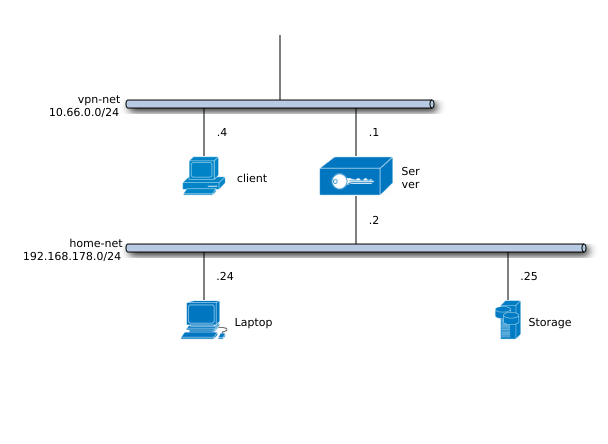
Having advertised the network address of home-net the client should be able to access Laptop (192.168.178.24) or Storage (192.168.178.25). Also keep in mind that the client will be able to access the whole 192.168.178.0/24 range. You may want to add client-specific access policies.
NATing client traffic to the Internet
#
By passing client’s traffic through the OpenVPN server you’ll need to implement NATing in order to let your clients access the Internet or other subnets.
1
|
root@debian:/# iptables -t nat -A POSTROUTING -s 10.66.0.0/24 -o eth0 -j MASQUERADE
|
Client based attack vectors
#
Regardless the countermeasures taken to secure the server, as a client you want your VPN connection to be safe and secure. In a hostile environment like a coffee shop or on any security conferences you want to keep your data safe from any curios eyes. Using a VPN no one could have a look at at the data inside the “stream” but there are some problems you should be aware of.
An attacker could bring down your VPN connection by spoofing the server and sending you TCP packets with a RST flag inside it. As a consequence this might destroy the virtual interface which in turn will remove all routing rules previously added by the OpenVPN client regarding that specific interface. Afterwards you will be using your physical interface without any further protection. And the worst thing about it: You won’t even notice it!
As found on inputoutput.io and agwa.name there are several methods how to increase client security either by using firewall rules or routing tables. I’ll have a look at both.
DNS
#
Even though your VPN provider will “push” to the clients a trust DNS server, the DHCP server might override this information causing the client to use an untrusted DNS server. In that case the retrieval of DNS information over DHCP should be avoided. Hard-coding an IP address of a trusted DNS server like 8.8.8.8 is recommended.
The client will get the DNS information from the server, however the /etc/resolv.conf has to be adapted as well. I’ve found some hook script which will modify your resolv.conf with the information from the server. On Arch Linux there is an AUR package as well. After installing the hook script, also change the client config file to make this work:
1
2
3
|
script-security 2
up /etc/openvpn/update-resolv-conf
down /etc/openvpn/update-resolv-conf
|
After connecting to the server, you should see sth like this:
1
2
3
4
5
|
...
Mon Nov 16 14:05:45 2015 /etc/openvpn/update-resolv-conf tun0 1500 1570 10.66.0.6 10.66.0.5 init
push "dhcp-option DNS 208.67.222.222"
push "dhcp-option DNS 8.8.8.8"
...
|
[Update 2015-11-24]: The update-resolv-conf is now called from another script (see below). The config file should now look like this:
1
2
3
|
# Run scripts after tunnel is up or down
up "./init.sh -u"
down "./init.sh -d"
|
Denial of Service
#
In the case of our VPN connection DoS attacks would bring down the TCP stream which in turn will cause the virtual interface go down and finally also removing all routing information. In the worst case the client won’t have any protection at all (otherwise provided by the VPN tunnel). But first let’s have a look at what happens when a client connects to the VPN server:
1
2
3
4
5
6
7
|
1) Fri Nov 13 13:17:13 2015 /usr/bin/ip link set dev tun0 up mtu 1500
2) Fri Nov 13 13:17:13 2015 /usr/bin/ip addr add dev tun0 local 10.66.0.6 peer 10.66.0.5
3) Fri Nov 13 13:17:13 2015 /usr/bin/ip route add xx.xx.xx.xx/32 via 192.168.66.1
4) Fri Nov 13 13:17:13 2015 /usr/bin/ip route add 0.0.0.0/1 via 10.66.0.5
5) Fri Nov 13 13:17:13 2015 /usr/bin/ip route add 128.0.0.0/1 via 10.66.0.5
6) Fri Nov 13 13:17:13 2015 /usr/bin/ip route add 192.168.178.0/24 via 10.66.0.5
7) Fri Nov 13 13:17:13 2015 /usr/bin/ip route add 10.66.0.1/32 via 10.66.0.5
|
Obviously the VPN client did following steps:
- Set the MTU for the virtual device (tun0)
- Set the virtual client (
10.66.0.6) and the server endpoints (10.66.0.5)
- Add a static routing rule for the VPN server over 192.168.66.1. Prevents the encrypted VPN traffic from being sent via the VPN itself.
0.0.0.0/1 and 128.0.0.0/1 cover the entire IPv4 IP address pool. This will basically route all traffic to the Internet through 10.66.0.5 (tun0)- The
home-net subnet (192.168.178.0/24) should also be routable over tun0
- Route for the server IP address in the
vpn-net subnet
Now if a DHCP server pushes a subnet mask for a bigger subnet then this will mask/override the masks from the VPN server. So in some cases the routing information from the DHCP server will be more specific than the OpenVPN routes. For example
1
|
/usr/bin/ip route add 8.8.8.0/16 via 192.168.66.2
|
will be more specific than:
1
2
|
/usr/bin/ip route add 128.0.0.0/1 via 10.66.0.5
/usr/bin/ip route add 192.168.178.0/24 via 10.66.0.5
|
I’ve found some ways how to prevent this kind of attacks. On a Linux based system one could use different routing tables or harden firewall rules to restrict connection outside the VPN tunnel.
Use of different routing tables
#
So the main idea described by Andrew was to use multiple routing tables (I didn’t even know one could do that) by putting the OpenVPN routes into a dedicated routing table. So basically we’ll add routing information that say:
- If a packet is destinated to the OpenVPN server, use the main table
- All other packets should use the OpenVPN table
This way you’ll keep your OpenVPN routes safe from the DHCP ones. Using /usr/bin/ip we will add some rules in the routing policy database and do what is called policy routing. The rules are being stored in a RPDB (routing policy database). The RPDB controls in which order the kernel search through the routing tables.
According to the man page (ip-rule(8)):
Each policy routing rule consists of a selector and an action predicate. The RPDB is scanned in order of
decreasing priority. The selector of each rule is applied to {source address, destination address, incoming
interface, tos, fwmark} and, if the selector matches the packet, the action is performed. The action predi‐
cate may return with success. In this case, it will either give a route or failure indication and the RPDB
lookup is terminated. Otherwise, the RPDB program continues with the next rule.
Also have a look at http://linux-ip.net/html/routing-rpdb.html for some useful examples.
Add rules to the RPDB
#
At startup time the kernel configures the default RPDB consisting of three rules (from the man page):
- Priority: 0, Selector: match anything, Action: lookup routing table local (ID 255). The local table is a special routing table containing high priority control routes for local and broadcast addresses. Rule 0 is special. It cannot be deleted or overridden.
- Priority: 32766, Selector: match anything, Action: lookup routing table main (ID 254). The main table is the normal routing table containing all non-policy routes. This rule may be deleted and/or overridden with other ones by the administrator.
- Priority: 32767, Selector: match anything, Action: lookup routing table default (ID 253). The default table is empty. It is reserved for some post-processing if no previous default rules selected the packet. This rule may also be deleted.
Let’s have a look at the configuration:
1
2
3
4
|
/usr/bin/ip rule add to <openvpn-server> table main pref 1000    (1)
/usr/bin/ip rule add to <openvpn-server> unreachable pref 1001   (2)
/usr/bin/ip rule add table 94 pref 1002                          (3)
/usr/bin/ip rule add unreachable pref 1003                       (4)
|
By using preferences numbers we can ensure that the rules are prioritized correctly. Now some explanations
- The first 2 rules [(1) and (2)] apply to packets whose destination is the IP address of the OpenVPN server.
- The 2nd rule prevents VPN server packets being routed through the VPN tunnel itself (in the case the main routing table is empty)
- The 3rd command defines a new routing table (whose id is 94)
- The last rules prevents packets from using the main table in case the OpenVPN table (id = 94) is empty.
Let’s have a look at the IP rule policy after the rules have been added:
1
2
3
4
5
6
7
8
|
\\( ip rule
0:	from all lookup local
1000:	from all to <server IP addr> lookup main
1001:	from all to <server IP addr> unreachable
1002:	from all lookup 94
1003:	from all unreachable
32766:	from all lookup main
32767:	from all lookup default
|
In order of priority the rules say:
- All traffic destinated to the should lookup for routing information in table main
- All other traffic should lookup for routing information in table 94.
So let’s try that out! Here are routes for table main:
1
2
3
|
\\) ip route show
default via 192.168.66.1 dev wlan0  proto static  metric 600
192.168.66.0/24 dev wlan0  proto kernel  scope link  src 192.168.66.61  metric 600
|
Although there is a default route in the main table, packets shouldn’t be able to be sent because we have not defined yet any routes for table 94:
1
2
|
\\( ping h.de
connect: Network is unreachable
|
After removing the IP rules:
1
2
3
4
|
/usr/bin/ip rule del to <openvpn-server>table main pref 1000
/usr/bin/ip rule del to <openvpn-server> unreachable pref 1001
/usr/bin/ip rule del table 94 pref 1002
/usr/bin/ip rule del unreachable pref 1003
|
… everything is back to normal:
1
2
3
4
5
6
7
8
9
|
\\) ping h.de -c 3
PING h.de (212.34.167.36) 56(84) bytes of data.
64 bytes from plesk3.odn.de (212.34.167.36): icmp_seq=1 ttl=53 time=27.8 ms
64 bytes from plesk3.odn.de (212.34.167.36): icmp_seq=2 ttl=53 time=32.1 ms
64 bytes from plesk3.odn.de (212.34.167.36): icmp_seq=3 ttl=53 time=30.4 ms

--- h.de ping statistics ---
3 packets transmitted, 3 received, 0% packet loss, time 2002ms
rtt min/avg/max/mdev = 27.817/30.167/32.187/1.804 ms
|
Adding routes to the OpenVPN table
#
In the next steps OpenVPN should add its routing information to the previously created routing table and not the main one.
1
2
|
/sbin/ip route add 0.0.0.0/0.0.0.0 table 94 dev tun0 via 10.66.0.5
/sbin/ip route add 10.66.0.1/255.255.255.255 table 94 dev tun0 via 10.66.0.5
|
Now you review the routing information in table 94:
1
2
3
4
|
\\( ip route show table 94
default via 10.66.0.5 dev tun0
10.66.0.1 via 10.66.0.5 dev tun0
10.66.0.5 dev tun0  proto kernel  scope link  src 10.66.0.6
|
Andrew wrote some hook script you can download here. Save this to you machine and make it executable:
1
2
3
|
# wget https://www.agwa.name/blog/post/hardening\_openvpn\_for\_def\_con/media/route
# cp route /usr/local/bin/route
# chmod a+x /usr/local/bin/route
|
Now the client config file has to be modified:
1
2
3
4
|
setenv OPENVPN\_ROUTE\_TABLE 94
route-noexec
route-up /usr/local/bin/route
route 0.0.0.0 0.0.0.0
|
The server config has to be modified as well by removing the remote-gateway option:
1
|
# push "redirect-gateway def1"
|
Conclusion
#
This solution seems to be very clever, however I’ve had performance issues and also multiple routing problems. Perhaps will somebody see and comment what I’m doing wrong.
Use of firewall rules
#
Uncomplicated Firewall (ufw)
#
I’ll be using ufw for setting up my firewall. First add these lines to /etc/ufw/before.rules before the “filer* line:
 1
 2
 3
 4
 5
 6
 7
 8
 9
10
|
# NAT (Network Address Translation) table rules
*nat
:POSTROUTING ACCEPT [0:0]

# Allow traffic from clients to enp1s0
-A POSTROUTING -s 10.66.0.0/24 -o wlan0 -j MASQUERADE

# Don't delete these required lines, otherwise there will be errors
*filter
...
|
Now enable the firewall:
1
2
3
4
|
# ufw enable
Firewall is active and enabled on system startup
# ufw status
Status: active
|
… add some ufw rules:
 1
 2
 3
 4
 5
 6
 7
 8
 9
10
11
12
13
14
15
16
17
18
19
20
21
22
23
24
25
|
SERVER=`host <vpn-server> | awk '{ print \\)4; }'`

# Default policies
ufw default deny incoming
ufw default deny outgoing

# OpenVPN interface (adjust interface accordingly to your configuration)
ufw allow in on tun0
ufw allow out on tun0

# Deny any TCP/UDP connections on wlan0
ufw deny out on wlan0
ufw deny in on wlan0

# Allow local LAN on wlan0 (adjust ip accordingly to your configuration)
ufw allow in on wlan0 from 192.168.0.0/16
ufw allow out on wlan0 to 192.168.0.0/16

# Over wlan0 allow only traffic to VPN server (:80/udp)
ufw allow in on wlan0 from \\(SERVER port 80 proto udp
ufw allow out on wlan0 from \\)SERVER port 80 proto udp

# DNS
ufw allow in from any to any port 53
ufw allow out from any to any port 53
|
Check that:
 1
 2
 3
 4
 5
 6
 7
 8
 9
10
11
12
13
14
15
16
|
\\( ufw status verbose
Status: active

To                         Action      From
--                         ------      ----
Anywhere on tun0           ALLOW       Anywhere
Anywhere on wlan0          DENY        Anywhere
Anywhere on wlan0          ALLOW       192.168.0.0/16
Anywhere on wlan0          ALLOW       <vpn-server> 80/udp
53                         ALLOW       Anywhere

Anywhere                   ALLOW OUT   Anywhere on tun0
Anywhere                   DENY OUT    Anywhere on wlan0
192.168.0.0/16             ALLOW OUT   Anywhere on wlan0
Anywhere                   ALLOW OUT   <vpn-server> 80/udp on wlan0
53                         ALLOW OUT   Anywhere
|
[Update 2014-11-24]: The initialization script called by OpenVPN uses iptables. But feel free to adapt if you want to stick with ufw.
Using iptables (prefered)
#
[Update 2015-11-24]: If you don’t want any fancy firewall frameworks, you can of course stick to iptables.
 1
 2
 3
 4
 5
 6
 7
 8
 9
10
11
12
13
14
15
16
17
18
19
20
21
22
23
24
25
26
27
28
29
30
31
32
33
34
35
36
37
38
39
|
# VPN server address
VPN\_SERVER=<vpn-server>

# Local LAN subnet
LOCAL\_LAN=192.168.0.0/16

# Interface where your local LAN is accessibble
GW\_INT=wlan0

# The VPN virtual interface
VPN\_INT=tun0

# Do NATing from VPN interface to gateway interface
iptables -t nat -P POSTROUTING ACCEPT
iptables -t nat -A POSTROUTING -s \\)VPN_LAN -o \\(GW\_INT -j MASQUERADE

# Allow all traffic on VPN interface
iptables -A OUTPUT -o \\)VPN_INT -j ACCEPT
iptables -A INPUT  -i \\(VPN\_INT -j ACCEPT

# Allow traffic to/from VPN server
iptables -A INPUT  -i \\)GW_INT -s \\(VPN\_SERVER -p udp --sport 80 -m state --state NEW,ESTABLISHED -j ACCEPT
iptables -A OUTPUT -o \\)GW_INT -d \\(VPN\_SERVER -p udp --dport 80 -m state --state ESTABLISHED -j ACCEPT

# Allow local traffic
iptables -A OUTPUT -o \\)GW_INT -d \\(LOCAL\_LAN -s \\)LOCAL_LAN -j ACCEPT
iptables -A INPUT  -i \\(GW\_INT -s \\)LOCAL_LAN -d \\(LOCAL\_LAN -j ACCEPT

# Define here other exceptions
# ...

# Deny all traffic on gateway interface by default
iptables -A INPUT -i \\)GW_INT -j DROP
iptables -A OUTPUT -o \\(GW\_INT -j DROP

# Block IPv6 traffic
ip6tables -P INPUT DROP
ip6tables -P OUTPUT DROP
ip6tables -P FORWARD DROP
|
All these rules are part of this script which is called by OpenVPN (up/down commands):
1
2
3
|
# Run scripts after tunnel is up or down
up "./init.sh -u"
down "./init.sh -d"
|
Have a look at the script and add your own actions to be executed when the tunnel is up or down. Also make sure you save the script in the same directory where the configuration files resides.
That’t it! Now you should have no leaks if your VPN is down. Let’s check that out
- Before establishing the VPN tunnel
1
2
3
4
5
|
\\) ping h.de -c 4
PING h.de (212.34.167.36) 56(84) bytes of data.
^C
--- h.de ping statistics ---
0 packets transmitted, 0 received
|
- After establishing the VPN
1
2
3
4
5
6
7
8
|
$ ping h.de -c 4
PING h.de (212.34.167.36) 56(84) bytes of data.
64 bytes from plesk3.odn.de (212.34.167.36): icmp_seq=1 ttl=50 time=122 ms
64 bytes from plesk3.odn.de (212.34.167.36): icmp_seq=2 ttl=50 time=83.8 ms
64 bytes from plesk3.odn.de (212.34.167.36): icmp_seq=3 ttl=50 time=82.6 ms
^C
--- h.de ping statistics ---
3 packets transmitted, 3 received, 0% packet loss, time 2003ms
|
Download configs
#
You can download my server/client configs and the initialization script and from following gists:
ToDos
#
Here are some todos I’d like to implement in near future:
- Use of alternative authentication methods
- Configure client-specific rules and access policies
- Add 2FA authentication to OpenVPN
- Have a look at Shorewall
References
#
Some useful references: